本文不涉及IIS 7.0 + FastCGI + PHP的安装, 而是谈如何完整配置EduSoho站点。
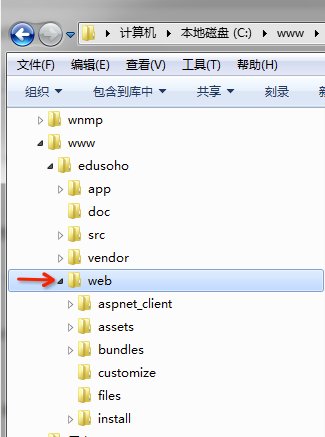
1、下载 EduSoho后,解压缩,先看看我的站点目录结构
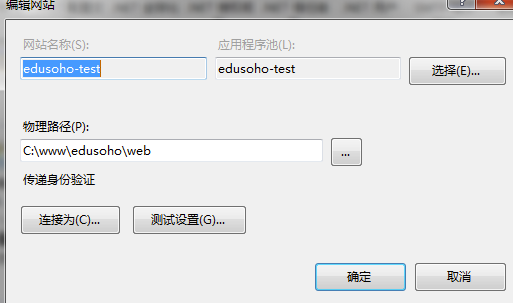
2、IIS路径配置
3、files目录权限设置,去除脚本权限

4、Php.ini三个参数别忘了改
post_max_size = 300m
upload_max_filesize = 300m
memory_limit = 300m
5、提高IIS本身的上传大小限制
找到 C:\Windows\System32\inetsrv\config\schema\IIS_schema.xml
停止IIS,将权限分配给管理员,按照如下提示修改
<element name="requestLimits">
<attribute name="maxAllowedContentLength" type="uint" defaultValue="30000000" />//这里多加个0,支持300M
......
</element>
6、选中站点根目录,选中URL重写(url rewrite)
文本配置,可以通过url重写“导入功能”
# Defend your computer from some worm attacks
RewriteRule .*(?:global.asa|default\.ida|root\.exe|\.\.).* . [F,I,O]
# we skip all files with .something except .html
RewriteCond URL .*\..+$
RewriteCond URL (?!.*\.html$).*
RewriteRule (.*) $1 [L]
# we keep the .php files unchanged
RewriteRule (.*\.php)(.*) $1$2 [L]RewriteRule (.*) /app.php [L]
另一种形式,web.config,直接编辑网站web根目录下的web.config,加入如下
<rule name="已导入的规则 1">
<match url=".*(?:global.asa|default\.ida|root\.exe|\.\.).*" />
<action type="CustomResponse" url="." statusCode="403" statusReason="Forbidden" statusDescription="Forbidden" />
</rule>
<rule name="已导入的规则 2" stopProcessing="true">
<match url="(.*)" ignoreCase="false" />
<conditions logicalGrouping="MatchAll">
<add input="{REQUEST_URI}" pattern=".*\..+$" ignoreCase="false" />
<add input="{REQUEST_URI}" pattern="(?!.*\.html$).*" ignoreCase="false" />
</conditions>
<action type="Rewrite" url="{R:1}" />
</rule>
<rule name="已导入的规则 3" stopProcessing="true">
<match url="(.*\.php)(.*)" ignoreCase="false" />
<action type="Rewrite" url="{R:1}{R:2}" />
</rule>
<rule name="已导入的规则 4" stopProcessing="true">
<match url="(.*)" ignoreCase="false" />
<action type="Rewrite" url="/app.php" />
</rule>
7,大于30M文件无法上传的问题:
你整理了啊。
@HiZhou:你整理了啊。
这个是IIS 7的。
可是按照修改web.config的方法,弄完后,网站首页打开没问题,管理页是“该页无法显示”的啊
@fengha:可是按照修改web.config的方法,弄完后,网站首页打开没问题,管理页是“该页无法显示”的啊
这个很奇怪啊。你还导入看看
安装到数据库那一步 下一步是
有没有其他人碰过这个问题
@江南_600:安装到数据库那一步 下一步是 500 - 内部服务器错误。 您查找的资源存在问题,因而无法显示。 ...
亲爱的朋友,EduSoho安装在IIS下,不能很好的工作。建议改成其他环境。
@江南_600 我碰到了,求解