写的很好,基本用法都涵盖了。我决定把这个系列的都看一遍~谢谢你的文章!

UITableView用来以表格的形式显示数据。关于UITableView,我们应该注意:
(1)UITableView用来显示表格的可见部分,UITableViewCell用来显示表格的一行。
(2)UITableView并不负责存储表格中的数据,而是仅仅存储足够的数据使得可以画出当前可见部分。
(3)UITableView从UITableViewDelegate协议获取配置信息,从UITableViewDataSource协议获得数据信息。
(4)所有的UITableView实现时实际上只有一列,但是我们可以通过向UITableViewCell中添加子视图,使得它看起来有好几列。
(5)UITableView有两种风格:
① Grouped:每一组看起来像是圆矩形;
② Plain:这是默认风格,可以修改成Indexed风格。
在下边的小例子中,我们将先实现显示一列数据,然后在每行添加图像,之后再看看UITableViewCell的四种分别是什么样的。最后再进行其他操作,比如设置缩进、修改字体大小和行高等。
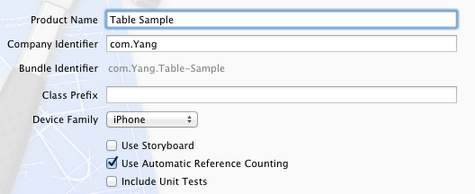
1、运行Xcode 4.2,新建一个Single View Application,名称为Table Sample:
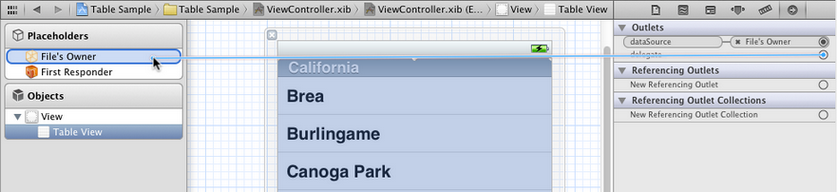
2、单击ViewController.xib,使用Interface Builder给视图添加一个UITableView控件,并使其覆盖整个视图:

3、选中新添加的UITableView控件,打开Connection Inspector,找到delegate和datasource,从它们右边的圆圈拉线到File's Owner图标:
4、单击ViewController.h,在其中添加代码:
#import <UIKit/UIKit.h>
@interface ViewController : UIViewController<UITableViewDelegate, UITableViewDataSource>
@property (strong, nonatomic) NSArray *listData;
@end
5、单击ViewController.m,在其中添加代码:
5.1 在@implementation后面添加代码:
@synthesize listData;
5.2 在viewDidLoad方法中添加代码:
- (void)viewDidLoad
{
[super viewDidLoad];
// Do any additional setup after loading the view, typically from a nib.
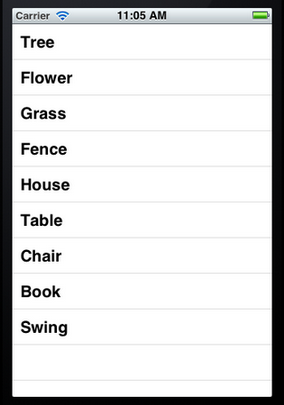
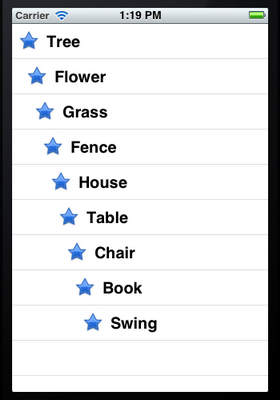
NSArray *array = [[NSArray alloc] initWithObjects:@"Tree", @"Flower",
@"Grass", @"Fence", @"House", @"Table", @"Chair",
@"Book", @"Swing" , nil];
self.listData = array;
}
5.3 在viewDidUnload方法中添加代码:
- (void)viewDidUnload
{
    [super viewDidUnload];
    // Release any retained subviews of the main view.
    // e.g. self.myOutlet = nil;
    self.listData = nil;
}
5.4 在@end之前添加代码:
#pragma mark -
#pragma mark Table View Data Source Methods
//返回行数
- (NSInteger)tableView:(UITableView *)tableView
 numberOfRowsInSection:(NSInteger)section {
    return [self.listData count];
}

//新建某一行并返回
- (UITableViewCell *)tableView:(UITableView *)tableView
         cellForRowAtIndexPath:(NSIndexPath *)indexPath {

    static NSString *TableSampleIdentifier = @"TableSampleIdentifier";

    UITableViewCell *cell = [tableView dequeueReusableCellWithIdentifier:
                             TableSampleIdentifier];
    if (cell == nil) {
        cell = [[UITableViewCell alloc]
                initWithStyle:UITableViewCellStyleDefault
                reuseIdentifier:TableSampleIdentifier];
    }

    NSUInteger row = [indexPath row];
    cell.textLabel.text = [listData objectAtIndex:row];
	return cell;
}
上面的第二个方法中,
UITableViewCell *cell = [tableView dequeueReusableCellWithIdentifier: TableSampleIdentifier];
这个语句根据标识符TableSampleIdentifier寻找当前可以重用的UITableViewCell。当某行滑出当前可见区域后,我们重用它所对应的UITableViewCell对象,那么就可以节省内存和时间。
如果执行词语后,cell为nil,那我们再创建一个,并设置去标识符为TableSampleIdentifier:
cell = [[UITableViewCell alloc] initWithStyle:UITableViewCellStyleDefault reuseIdentifier:TableSampleIdentifier];
这里UITableViewCellStyleDefault是表示UITableViewCell风格的常数,除此之外,还有其他风格,后面将会用到。
注意参数(NSIndexPath *)indexPath,它将行号row和部分号section合并了,通过[indexPath row];获取行号。之后给cell设置其文本:
cell.textLabel.text = [listData objectAtIndex: row];
6、运行一下:
7、给每一行添加图片:
7.1 将图片资源添加到工程:拖到工程中,前面的文章有提到。
7.2 在cellForRowAtIndexPath方法的return语句之前添加代码:
UIImage *image = [UIImage imageNamed:@"blue.png"];
cell.imageView.image = image;
UIImage *highLighedImage = [UIImage imageNamed:@"yellow.png"];
cell.imageView.highlighedImage = highLighedImage;
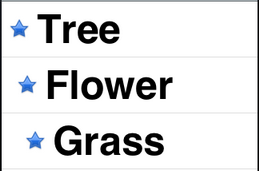
7.3 运行,效果如下:

可以看到,每行左边都出现一张图片。当选中某行,其图片改变。
8、设置行的风格:
表示UITableViewCell风格的常量有:
UITableViewCellStyleDefault
UITableViewCellStyleSubtile
UITableViewCellStyleValue1
UITableViewCellStyleValue2
这几种风格的区别主要体现在Image、Text Label以及Detail Text Label。
为了体现风格,在cellForRowAtIndexPath方法的return语句之前添加代码:
cell.detailTextLabel.text = @"Detail Text";
然后将
cell = [[UITableViewCell alloc] initWithStyle:UITableViewCellStyleDefault reuseIdentifier:TableSampleIdentifier];
中的UITableViewCellStyleDefault依次换成上面提到的四个风格常量,并运行,效果分别如下:

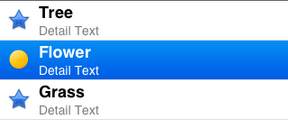
UITableViewCellStyleDefault UITableViewCellStyleSubtle
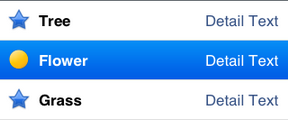
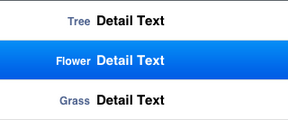
UITableViewCellStyleValue1 UITableViewCellStyleValue2
9、设置缩进:
将所有行的风格改回UITableViewCellStyleDefault,然后在@end之前添加代码如下:
#pragma mark Table Delegate Methods
- (NSInteger)tableView:(UITableView *)tableView indentationLevelForRowAtIndexPath:(NSIndexPath *)indexPath {
    NSUInteger row = [indexPath row];
    return row;
}
这里将第row行缩进row,如下图所示:
10、操纵行选择:
在@end之前添加代码:
- (NSIndexPath *)tableView:(UITableView *)tableView willSelectRowAtIndexPath:(NSIndexPath *)indexPath {
    NSUInteger row = [indexPath row];
    if (row%2 == 0) {
        return nil;
    }
    return indexPath;
}
上面的方法在选择某行之前执行,我们可以在这个方法中添加我们想要的操作。这里,我们实现的是,如果选择的行号(从0开始计)是偶数,则取消选择。
在@end之前添加代码:
- (void)tableView:(UITableView *)tableView didSelectRowAtIndexPath:(NSIndexPath *)indexPath {
    NSUInteger row = [indexPath row];
    NSString *rowValue = [listData objectAtIndex:row];

    NSString *message = [[NSString alloc] initWithFormat:
                         @"You selected %@", rowValue];
    UIAlertView *alert = [[UIAlertView alloc]
                          initWithTitle:@"Row Selected!"
                          message:message
                          delegate:nil
                          cancelButtonTitle:@"Yes I Did"
                          otherButtonTitles:nil];
    [alert show];
    [tableView deselectRowAtIndexPath:indexPath animated:YES];
}
当选择某行之后,就弹出一个Alert,用来显示我们所做的选择。
运行一下,你会发现第0、2等行无法选择。选择奇数行时会弹出提示:
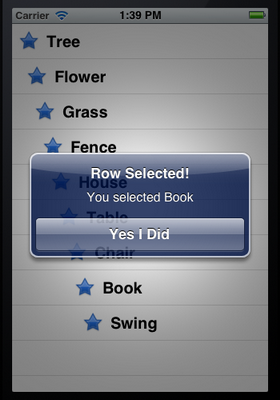
而且关闭提示框后,选择的那行也被取消了选择,用的语句
[tableView deselectRowAtIndexPath:indexPath animated:YES];
11、设置字体大小和表格行高:
11.1 在cellForRowAtIndexPath方法中的return之前添加代码,用于设置字体和大小:
cell.textLabel.font = [UIFont boldSystemFontOfSize:50];
11.2 在@end之前添加代码,用于设置行高:
- (CGFloat)tableView:(UITableView *)tableView heightForRowAtIndexPath:(NSIndexPath *)indexPath {
    return 70;
}
运行,看看效果:
写的很好,基本用法都涵盖了。我决定把这个系列的都看一遍~谢谢你的文章!